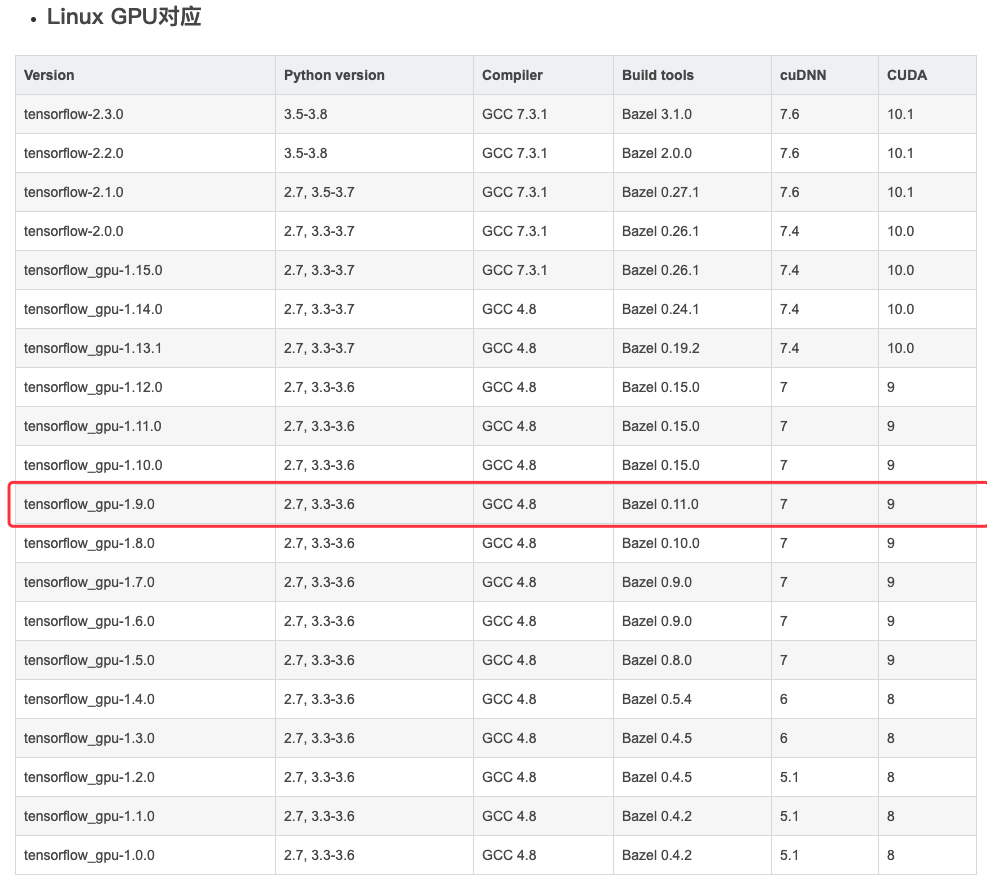
每次跑别人代码的时候,需要先用conda新建一个相同的环境以减少版本错误的出现,如:
conda create -n MDL4OW tensorflow-gpu==1.9 keras==2.1.6 Python=3.6 安装方式:
npm install -g tldr使用方式:
tldr <commend>如何使用Pycharm自动同步本地和远程服务器项目代码以及远程运行程序 访问远程Visdom
尝试: 1. 在pycharm上进行结构构件, 在pycharm-jupyter上进行变量间跳转等操作 2. 在网页jupyter进行jupyter程序条理性的笔记及运行结果 3. 如果有问题使用jupyterlab或者改为pycharm文件进行调试.
import csv
import os
from time import time
from tqdm import tqdm
import numpy as np
import pandas as pd

import torch as t
import torch.nn as nn

import matplotlib.pyplot as plt
plt.style.use('seaborn') # 设置使用的样式

from utils_my import crash_on_ipy
crash_on_ipy()import matplotlib.pyplot as plt
plt.style.use('seaborn') # 设置使用的样式
# plt.style.use(['science', 'no-latex'])
# %config InlineBackend.figure_format = 'svg'import keras
from keras.layers import Conv2D, Conv3D, Flatten, Dense, Reshape, BatchNormalization
from keras.layers import Dropout, Input
from keras.models import Model
from keras.optimizers import Adam
from keras.callbacks import ModelCheckpoint
from keras.utils import np_utilsimport sys
sys.path.append("/mnt/StuFile/Sqh")
from utils_my import HSI_preprocess as hsipre
help(hsipre)tree -I node_modules > tree.text解决git下载出现:Failed to connect to 127.0.0.1 port 1080: Connection refused拒绝连接错误
# 查询
git config --global http.proxy
env|grep -I proxy

# 取消代理设置
git config --global --unset http.proxy
git config --global --unset https.proxytf:
import tensorflow
print(tensorflow.test.is_gpu_available())
tf.config.list_physical_devices('GPU')
import tensorflow as tf
tf.test.gpu_device_name()torch:
import torch
torch.zeros(1).cuda()
显示显卡信息:
watch -n 1 nvidia-smisudo service lightdm start
ubuntu20.04,Cuda11.0,需要安装1.9版本的
安装30系列显卡后,继续使用cuda10会出现问题,由于显卡架构原因需要升级cuda版本为11.0及以上。报错:
GeForce RTX 3080 with CUDA capability sm_86 is not compatible with the current PyTorch installation. The current PyTorch install supports CUDA capabilities sm_37 sm_50 sm_60 sm_61 sm_70 sm_75 compute_37.系统版本:ubuntu20.04
Nvidia官网下载最新显卡驱动
下载合适的cuda版本,我下的11.0
下载对应的cudnn版本,我的为8.0.5
测试是否成功
安装需要的框架:
TensorFlow:
pip install tensorflow==2.4.0rc0 -i https://pypi.doubanio.com/simple/ #GPU版本的,如果下载慢建议换源Pytorch:
conda install pytorch torchvision torchaudio cudatoolkit=11.0 -c pytorch报错:
Failed to initialize the CUDA platform: CudaError: The driver version is too low (error 30). Bminer requires 375.26 or later to work 用cuda() 时:
RuntimeError: CUDA unknown error - this may be due to an incorrectly set up environment, e.g. changing env variable CUDA_VISIBLE_DEVICES after program start. Setting the available devices to be zero.